Sunday, February 12, 2017

Engagement Dress: Vogue 1314

Photo by Sebastien Bicard

For a break in the wedding dress series, I present my engagement dress! Actually, it was just a dress I made and realized it was the best garment I had to wearing during my engagement photos. Our wedding photographer is Sebastien Bicard, based in Northern California but travels a TON so ring him if you need some really great pictures. He was amazing to work with, Pete and I aren't very good at getting our picture taken, but Sebastien made everything feel really natural. I totally recommend him! But I have him for May 27th!

Photo by Sebastien Bicard

For this dress I used Vogue 1314, a Rebecca Taylor design. Its a good old-fashioned knit sheath, but with lots and lots of ruching down the sides. I actually wish there was at least 50% more fabric to ruche up, as it is, I think its a little spare. I used merino wool knit (another step in my apparent goal to have an entire wardrobe of merino) from Stone Mountain and Daughter in Berkeley. There is no lycra in this fabric so I'm waiting to see how it will wear. I already notice the hem getting a little stretched out at the end of the day so I'm a bit worried. The entire dress is also lined in the same fabric so its quite cozy. 

Photo by Sebastien Bicard

As the dress and the lining are only sewn together at the neckline and armscyes, I find sometimes the lining rides up and bunches which is pretty annoying. Also, for a knit dress, the lining has a bust dart which is pretty weird. Might want to change that next time. 

Photo by Sebastien Bicard

You can't see my dress in this picture, its just my favorite one.

Tuesday, January 24, 2017

The Wedding Dress Series: #3

Lots of progress since the last posts and I am getting really excited! I'm just going to dive in with the pictures.

Please excuse my turquoise bra, its my something blue.

This was my first time using a Marfy pattern and you know, its kind of fun driving without a map. The only instructions are printed on the pattern themselves and they are translated from Italian. "Half-back on the grain?" It actually means "cut on the fold". Those patterns are super nice though, they go together seamlessly. Pun not intended, but welcomed. For the skirt, I kept the center-front length of V1486, but extended the side seams. For the back, I matched the side seam length and significantly extended the center-back. I want drama. For the ruffle, I eyeballed the length and gathered and gathered and gathered and gathered.

Oh this dress is so flat, I was really questioning my decisions.

So there's a lot of things wrong with V1, not least of all that it look like something out of Little House on the Prairie. Everything seems to depend on the skirt portion which in V1 is all wrong. Compared to the inspiration dress, the skirt needs to be quite a bit shorter and be more circle than A-line.


Oh that's so much better, I mean, look how happy I am.

Oh, that so much better. Pretty much that only thing that changes here is I redrafted the skirt. I recut the bodice because now I know where the waist is on the pattern is and wanted to test it out. I'm still trying to figure out the proportions, I know the whole dress could still be a little shorter in the front, but I don't know if I want to take length out from the ruffle, the skirt, or both. I was trying something out with the neckline, thinking maybe I'll go with a halter, but I've realized that with the size of my chest, a sweetheart neckline is really the most flattering. Doesn't hurt that my fiance has been requesting a strapless dress since we got engaged.

I just ripped the ruffle off the first dress and reused it, but you get the idea.

Now I'm going to focus on the interior corset, because there's really no reason to fit unless I'm fitting to how my body will be held underneath the dress itself. 

Saturday, December 31, 2016

The Wedding Dress Series #2

So with the style settled on and failing trying to keep from looking at more styles on Pinterest, its time to start the real work. For the foundation I am going with Marfy 2630, blatantly copying Poppykettle's AMAZING series on her wedding dress. I ordered the pattern and there was only one size left(!), so I went with it knowing it would probably have to redraft a bit anyway for the bust. I'll be following what Poppykettle's fabric choice as well.

Marfy 2630

For the bodice, I'm starting with another Marfy, this time 2616 which has some interesting folded bust darts that I think will complement the ruffles nicely. I'm still waffling between keeping the strapless look or making it into a halter. According to some advice from the amazing women of The Fabric Store in LA, I'll be attaching the corset to the dress itself. 

Marfy 2616

For the skirt portion, I'll be extremely modifying Vogue 1486. The inspiration skirt is actually two layers where the outer layer has the ruffle and the inner layer is a high-low circle skirt. And I'm keeping those pockets, oh yeah.

Vogue 1486
The fabric is all based on the amazing advice of Douglas from Britex Fabrics. According to Jason Wu's website, the dress is making of silk gazar. I went to Britex on a hunt for gazar and Douglas finally convinced me to turn away from gazar and turn to satin-faced silk organza. You were right all along Douglas, you are awesome. I plan to underline the bodice with flanelette and I'm still not sure what I'm going to line the bodice with, recommendations welcomed! I won't be lining the skirt, two layers should be fine. 

Saturday, December 10, 2016

The Wedding Dress Series: #1

I am getting married May 27 of next year! We have the band, the food, the photographer, the photobooth, the save-the-dates are out, and everyone is offering their help wherever they can. Of course that all pales in comparison to the dress. Now if you know me personally or are coming to the wedding, you have just signed an NDA, please don't share.

Photo from Vogue Pinterest 

I've looked at a lot of dresses. If you sew, you can imagine how many dresses I've looked at. I tried a bunch of dresses on and definitely decided that I wanted something big and modern, no rhinestone embelishments and such. I prefer a modern, clean style with nothing that implies lingerie. There have been short flirtations with other dresses, but those crushes passed and I've always come back to this dress from Jason Wu's Spring 2012 line. Those ruffles just get to me. I few months back I decided to stop looking at all the pictures and acknowledge that this was my dress, I just have to make it reality.

Sunday, December 4, 2016

Sewing For My Man

Is it just me or are men's clothes of medium quality and very expensive or terrible quality and kind of expensive? I was sick of Pete's clothes falling apart or pilling so bad they were translucent that I decided to make him a new sweater. He liked Thread Theory Newcastle Cardigan and I am a loyal fan of The Fabric Store's merino wool.

My handsome man! He says the sleeves are too long besides me having him try it on to confirm so I'll have to take the cuffs off and recut sometime. 

Pattern was fine, I do really like the way they put together their patterns. I'm not the biggest fan of Thread Theory's armscye drafts, they always seem to be puffy, almost feminine, which can be seen even in some of their samples so I fought to keep this one looking good. I think I did ok.

Required booty shot. There's a tiny bit of pilling where his backpack rests, but that's expected.

To jazz things up a bit I quilted the front and back yokes in a light-shade and weight merino. I quilted the yoke pieces then sewed them to the body, rather than quilting everything together, which turned out really well. Even the undercollar is quilted because I'm fancy like that.

I made him put on his sweater inside out in an airport to the confusion of a couple watching us

The insides of this garment are gorgeous if I do say myself. The shoulders are stabilized with twill tape and I am so proud of them! I've made Pete take it off to show people the shoulders. My machine couldn't make it through the layers of the button placket for buttonholes so I took it to a tailor in the city. It was $10 a buttonhole! I was ticked it was so expensive, but the sweater had languished closure-less in the closet for two months so I went ahead and paid. The buttons are lovely things from Stone Mountain and Daughter.

Little tack to keep the facing from flapping around and ticking off the wearer who gets ticked off at clothes easily

The weight of this is absolutely perfect for the Bay Area's constant chilliness. Pete overheats really easily and merino wool is perfect for regulating temperature. I want to make him another one, but the Newcastle is a fairly specific garment so we'll see what else I can do with the pattern.

Saturday, October 29, 2016

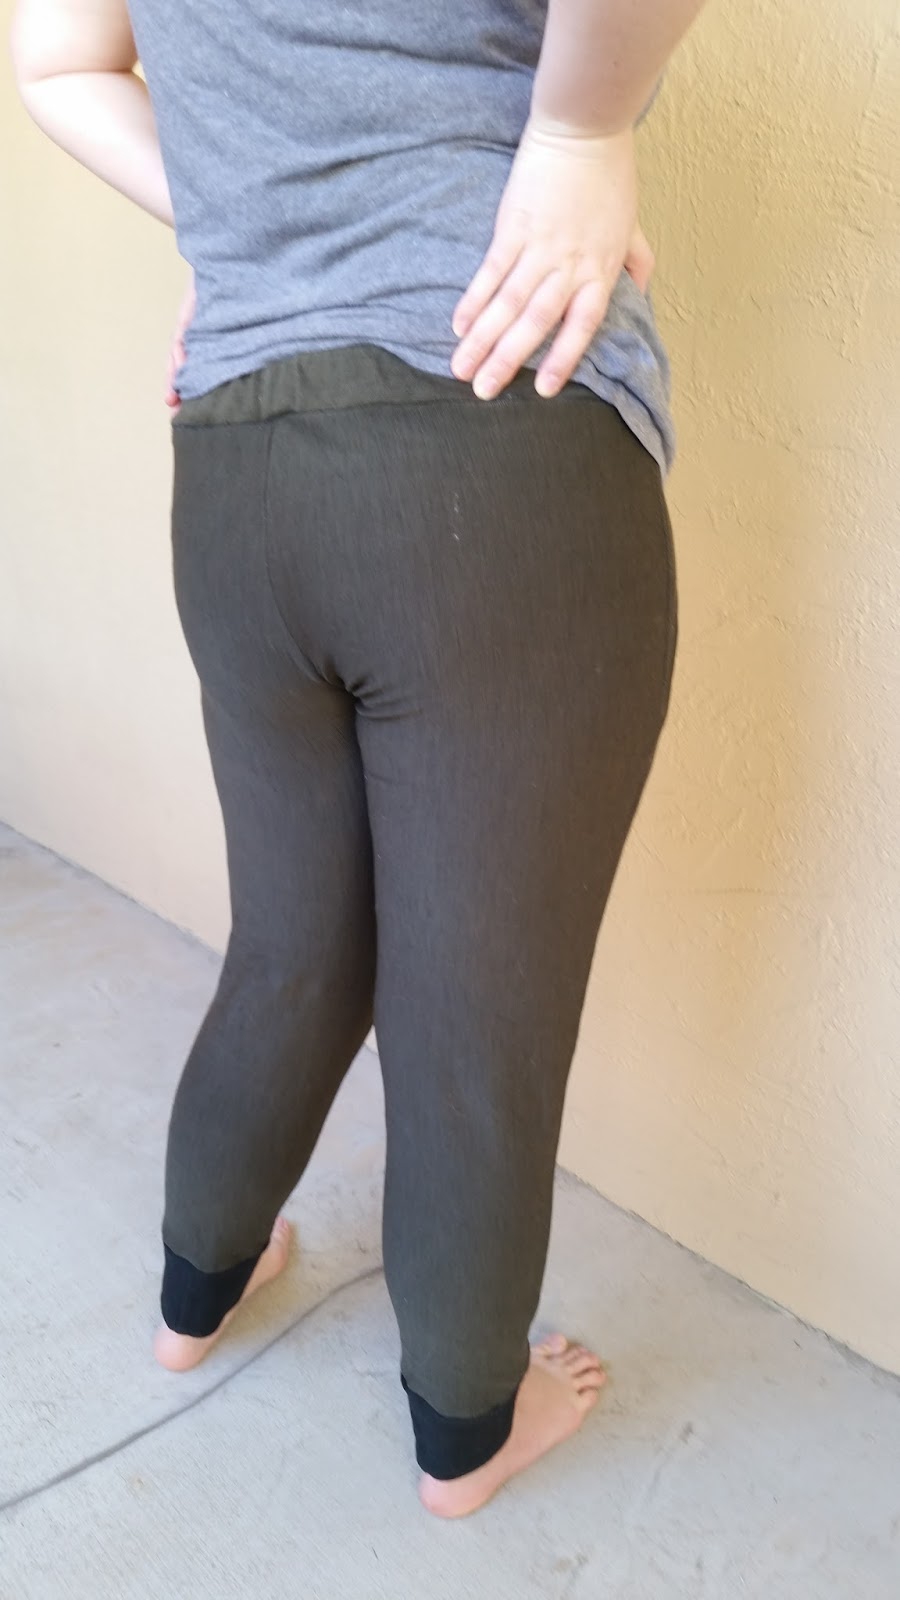
The Pants of Many Mistakes

I love these pants, but let's just start with: I made so many mistakes on these that I'm lucky I ended up with a waist and two leg holes. I've been wanting some of those trendy, fancy sweatpants for a while and what's more ridiculous than merino wool sweatpants.

I went with Named patterns Alexandria Peg Trousers and my favorite merino wool from The Fabric Store, previously seen here and here. That was the first mistake. The Alexandrias have front pleats and are really better suited for a thin fabric with all those layers that build up. The pattern says if you're going with a knit, use sweatshirt jersey, whatever that is, but from the sample it looks significantly thinner than what I used. So there, that was mistake #1.

Mistake #2 was a doozy and it all started out right with me making a muslin. I'm not about to cut into my favorite fabric in the whole world without knowing the pattern works on me. As printed, the Alexandria is really really high on my body, like very low crop top-high-waisted. Knowing that I shortened the waist, cut into my precious merino, and started sewing along merrily. Apparently I lost my mind because I did not redraft the crotch curve or the pockets into my altered pattern.  I was happily sewing along and went to put the pockets in and was terribly confused as to why the pocket curves were so small. Do you see where this is going yet? So the crotch on these pants are actually the shortened pocket curves. I figured it was close enough in shape after comparing them. Then I recut my pockets from my shortened crotch curves. And finally I had to true up the waist because that was all sorts of screwed up, what was supposed to be the middle of the pants was now the sides. Dude, I almost gave up sewing altogether.


Mistake #3 was small, but still silly. When I sewed by muslin, I used a thin jersey so the pleats were compact little things and I didn't think anything of it. With my merino these were like 9 layers and my machine hated sewing through them. Turns out when I actually sat down and studied the directions, I was folding the pleats wrong, it was only like 4 or 5 layers. Still, use a thin fabric!

One fun thing I did was I actually dyed the black pieces as I wanted some contrast, but I'm too cheap (and I hate waste) to buy 1/2 yard (minimum cut) and only use a fraction. The dye took fantastically and hasn't faded a bit. I recut the waistband so could insert the contrast piece and I added some cuffs.


Anyways, I love these pants. I wear then ALL THE TIME, so much so that the crotch is actually significantly pilled, damnit, so I don't really wear them to last minute grocery store runs anymore. The fit is a bit wonky, but that's 100% my fault as the crotch are pockets and the sides are the middle. I'd love to make another pair in a suitable fabric, silk twill maybe, without totally screwing everything up.

Wednesday, September 7, 2016

Ms. Morris and the Quilted Sleeve

So I moved to the San Francisco area back in November and no lie, the temperature has changed by at most 10 degrees that entire time. My body still thinks its sometime in February. My wardrobe made for Boston and then Los Angeles weather, either hot or really, really cold is just not cutting it. I need a max 75 degrees and windy as f--- wardrobe.


Enter my new Morris from my pattern soulmate Grainline. Ms. Morris is perfect, I can throw her over my large collection of sleeveless blouses and wear them to work and through the wind tunnel that is San Francisco. The fabric is an amazing merino wool, nylon, lycra blend from my fabric store soulmate, The Fabric Store. This fabric is probably stretchier than what Jen recommends, but the nylon and lycra content give the fabric an amazing recovery and there has been absolutely no bagging whatsoever. I interfaced the facings, but not any of the body.

The pattern went together beautifully, minus some changes that were completely my fault. I did a combination FBA and general lengthening and even though I thought I transferred all changes to the facing, I did not and didn't have enough fabric to recut them. I then removed the added length from the front, so the general shape of the hem is not as angular as the original pattern.


My favorite part of this blazer is the double layered and quilted sleeves! I love them! (they are also the reason I didn't have enough fabric to recut the facings) The wrong side of the fabric is kind of nubby so it needed to be lined in some way and quilting them like this was by far the most badass. I used quilting adhesive to keep the sleeves together and my walking foot so that everything would be nice and smooth. Love that walking foot. The only problem is that the sleeves are now a bit too heavy for the jacket so I used some black twill tape on the shoulders to keep the sleeves from pulling them down.


If I could change something about this blazer, I would probably line the fronts instead of facing them. When the SF winds blow my jacket open and then catch the facings, this literally turns into a parachute. Also the added weight of a lining would hold the sleeves up better.

Tuesday, February 2, 2016

Blue, Drapey Blouse: Lilith and Eve 101

I really liked this shirt before I took these pictures. Great way to start a post right?

Jeez, look how happy I am.

This pattern is the Drapey Blouse L101 from Lilith and Eve, which I completely and totally fell in love with when it was released. Isn't the long sleeve version great? That's what I wanted to make, but when I got it, I realized there was no collar stand and I didn't want to mess around making my own, so I went sleeveless, no collar. I got the PDF pattern, everything went together great with perfectly fine instructions. There's a bit of gaping at the neck and underarms, but I'm sure this fits someone else perfectly. I really wish that since the drapey part pretty much requires a sheer fabric, this came with a pieces drafted for lining that was fitted so the shirt wouldn't always require wearing a second layer.

The fabrics are from Mood and are the result of experimental pattern mis-matching, which I still really like. The shibori is a favorite, though it is fairly loosely woven and I was worried about it would stand up over time, but with gently handling when washing, its perfectly fine. This combination was a blast to pick out, especially since the Mood employees had zero faith in the outcome.


The problems are when this pattern, my body type, and the fabric all come together and everything is just a little bit off. The shibori fabric just a tiny bit too stiff to hang right, but I think anything other than the most diaphanous chiffon would work here. My man was making me crack up while we took pictures of this saying it looked like a giant vagina was on my back. Personally, I think it looks like a gaping mouth. Still, neither are body parts I will to be recreated in fabric on my back. Secondly this shirt has a lot of drape and the front just falls off me. Will someone please remind me that fitted is best for my body type? Seriously, tweet it to me. Everyday. Anyways, I look bigger than I am in these pictures and I don't like that so much.

ROAR!!!!!
I still think this is a super cute pattern, just maybe not for me.

Thursday, January 28, 2016

Stonemountain & Daughter Fabrics: Store Review

All the wool!!! That green is hard to photograph!

Since leaving Los Angeles and my go-to mecca, The Fabric Store, my mission has been finding a suitable Bay Area replacement. So in the search for a new textile haven, this weekend I dropped the man off at Cal and headed over to Stonemountain & Daughter just down the road.

The store is fairly small, but that's Berkeley. The front part is mainly quilting, some shirting, and a few novelties. Its also fairly packed with notions, but because the store is so small the notion area has a little bit of a lot of stuff. For example, the Aurafil stand has super picked over and was replenished with some non-Aurafil threads. For a store dedicating a large portion of its space to quilting, I didn't see much cotton thread. The second part of the store is fashion fabrics, cottons, rayons, wools, silks, linens, and a significant amount of polys (yup, I'm a textile snob, even high quality polys that I have used sew and wear disappointingly). There's a good mix of knits and wovens as well. Each shelf is well labeled and the fabrics are easy access, no bolts on top of other bolts, no digging!

The service was, I'd say, average. There were some really nice women working there and some prickly types. One of the nicer ladies cut out my fabric for me and we chatted about sewing and what I was going to make. She was very patient with me when my phone wouldn't refresh and I couldn't access the yardages I needed. Earlier she was working with another customer and answering the customer's every question, she was super knowledgeable! Prices were high compared to The Fabric Store, but the quality of the fabrics I was going for were good and the bay area ain't cheap.

And just because I care about how easy it is to get to places, the parking situation isn't great. Everything out front was full, but I was able to find parking relatively closely in a residential area. The store is towards the end of a Berkeley main road.

I'll go back because I prefer shopping for fabrics in person and not online, but I still want to try out Britex. For quilting though, Stonemountain & Daughters has some beautifully curated stuff. My haul this time was all wool, a merino and nylon blend jersey for a dress and a wool crepe for a sleeveless blazer. I also got a Thread Theory pattern and some lovely buttons. Now, excuse me while I convert my entire wardrobe to merino.

Sunday, January 10, 2016

Lark Tee: #1


I've been gone for a while to dedicate myself to finding a new job and great news, I got one! They say looking for a job is like having a full-time job itself and that sentiment is totally true. I worked all day, applied all night, and had no time to do fun things, like sew or knit or stay sane. Now that I'm happily settled into my new job, I'm back to regularly sewing and I want to steadily get back to blogging and participating in our community. Keep me honest, people!

My most recent project was the Lark Tee by the glorious Jen at Grainline. I love Grainline. The Lark was my first paper Grainline pattern and they are lovely with a cute little pattern book, even though I pretty much exclusively use the sew-alongs. I love that each of the options for the Lark has its own pattern piece, as in there are separate patterns for the cap, short, 3/4, and long sleeves. Sure, it takes up more paper, but its just more elegant, easier to cut, trace, whatever method you use. The neckline variations are also like that!

Check out those gloriously matching seams, even some points at the sleeves! Thank you walking foot!

I chose to make the 3/4 length sleeves (I live in San Francisco now, its chilly!) with a V-neck. V-necks generally look better with my larger bust, breaking up that expanse of fabric I need to cover everything. I used a rayon ponte (I think) that I got from my Mood shopping spree a few months back. It was originally meant to be a Named Pattern shirt, but in the end I realized Lark was more versatile and, of course, the V-neck. Its super stretchy, very stable, and has great recovery.

I sewed the pattern as drafted at first (sorry, no pics!) and the V hit way too high on me and actually made my boobs look really droopy (sad there's no pics now, aren't you?). I ended up lowering the neckline by about 1 1/4", but keeping the angle of the V. I also thought the neckline binding was too narrow, just my personal perception of proportions and cut a binding with an extra inch in width, resulting in a 1/2" wider folded binding. The shirt is also drafted to be fairly long and I ended up cutting off 2.5" with a wide hem. I also have to say, that neckline is sewed perfectly, go me!

Future changes will include widening the neckline which will also flatter my wider shoulders as well as lowering the back neckline which has too much fabric and is folding over the binding at the back of my neck. The fabric that I used is super stretchy, anything with less stretch and I would cut a much longer binding piece as this one (oh yeah, I cut a slightly longer binding to make up for cutting a lower neckline) even seems to be gathering a bit. I currently have two fabrics in my stash for Larks and am washing and cutting tomorrow!

Gathering at the back neckline.
In other news, I'm going to be an Auntie in a couple months now! I have tons of baby-sized scraps left over from a bunch of my clothes, are Auntie-and-me clothes totally gauche? Not that I care cause its happening! I'm thinking little onesie overalls for this fabric.

Saturday, May 9, 2015

Mood LA: Store Review

The fates of these beauties, from left: Megan Nielsen Cascade skirt, Named Kanerva shirt, and ByHandLondon Victoria blazer.
I got quite the windfall of Mood gift certificates for my birthday and Christmas last year and had a shit-ton of fun this weekend. I went all Scrooge McDuck in that place.

Let's do this chronologically:
The parking
Oh hell, the parking, its not fun. I get kinda anxious when I drive around downtown LA, some people are crazy. So you go into the alley behind Mood accessed by an entrance to the left of Mood on La Brea southbound or on the road to the right of Mood. They have a few spots in the back, 10 maybe, but they were already full. I was flagged down by a man asking if I was shopping at Mood and he told me to park in this area that had a big sign saying "No parking for Mood customers, you will be towed." Really, you want me to park here? "Yes, yes park." But I'm blocking these other cars. "Park here, park now." But I'm shopping at Mood. "WOMAN PARK." Ok he didn't say those exact words, but the connotation was there. So you give him your name, number, and car type and happily go shopping. Or so I naively thought.
After happily flouncing around Mood people started running around Mood yelling my car's stats. I ran to find them, "That's my car, please don't tow it, the man said I could park there, oh god I can't afford towing bills." Turns out they park cars three deep so when someone is done rolling in fabric mountains, Mood calls all the other customers to move their cars. Its not the most efficient, but I guess it better than parking 14 blocks away. Then the parking man told me to park in the emergency spot. The emergency spot? "Yes, over there" vaguely gestures over there. Um, ok, emergency, fire lane I guess. I get as close the wall as I can park and get out. Is this what you were talking about? "No, no, no, the emergency spot" gestures again. THE HANDICAPPED SPOT??? "Yes yes yes." This man hates me by now. Are you sure about that? "WOMAN PARK."
So the parking situation at Mood is not a blast, but at least you'll be prepared now. Good luck to you.

The fabric
Wow, that's a TON of fabric. The treasures are stored on tall (20') shelves that have about 5 shelves each. Fabric is stored 5 or so rolls deep. Its a bitch and a half pulling the bottom rolls out. Each roll has a little tag either hanging out or shoved into the tube with the price, content, and (sometimes) designer origin. Note the roll might have been stored backwards and you have to pull the roll out to the get to the tag. Some rolls are stored in buckets, much easier to access but not as space efficient.
All fabric aisles are simply labeled, shirting, cashmere, silk, etc.
There is so much fabric diversity and its wonderful to handle them in person. Most everything felt quality and you could spend hours and hours just looking at everything.

The people
This is where Yelp review scared the crap out of me. I didn't want surly staff ruining fabric shopping day. Its a sacred day. The cutting staff was wonderful! Helpful, not pushy, easily accessible. They helped me pull out rolls that were under 50 lbs of other fabrics, quickly cut things, nicely teased me about wanting to cut way more fabric than I needed (yes, they convinced me to buy less fabric), and offered sartorial advice when requested. They were lovely.
The checkout staff was super surly! Whoa. But you only have to spend like 4 minutes with them, so whatevs. Yes, they do have a doggie, but he was napping.

Mood was fun! I brought back beautiful fabric and had a ton of fun seeing all the possibilities on Mood's shelves. I highly recommend the store, especially if you have a handicapped placard :)

Tuesday, April 28, 2015

Noro Bowls


"You're going to knit bowls? What can you put in a knit bowl?" Said everyone (except Kelly!).

You can put almost anything in a knit bowl!

I saw these in a Noro magazine a few years back and then kicked myself for not buying it. Enter Ravelry and I found where I could buy the pattern, Felted Bowls, even though the magazine was out of print. Thank you Ravelry!!!! I also have a serious love for Noro. Those colors, I just want to fill my world with those colors. Specifically its Hitsuji, a big squishy, seriously wooly stuff. I forgot where I bought it, but I had to get it online because not a lot of people seem to stock this stuff (at least when I got it). The yarn was a Christmas present from my wonderful in-laws, thank you Pam and Jim!

The pattern was easy, but I didn't quite trust I was doing it correctly at first. This was also my first time felting anything (on purpose), which was slightly terrifying. The bowl on the right is more felted, the one in the middle is the least felted. They were all felted at different times. I think because the felting was so inconsistent, I didn't get the nesting effect that the pattern shows. I'll probably one day felt that middle one a bit more.


Shaping these wasn't the easiest thing in the world. You might able to tell the middle of the knitting circle isn't the middle of the bowl. Kind of like an off-center belly button. I have a slightly off-center belly button so it makes me feel better about myself. Lol. When the bowls are filled, who cares where the center is located? That's a deep thought man.

So what can you put into a knit bowl? I have one of work, I toss everything in there, pens, candy, hand lotion. At home, house keys, headbands, change, lipgloss. Great for keeping my messes contained!

Sunday, April 12, 2015

The Watson Set!

Making my first lingerie set gave me the same "oh my god I made that!" feeling as when I first started sewing a million years ago. Thank you Watson!

OMG I MADE THAT!!!

Let's start from the top down. I used stretch lace from Hart's Fabric, but I don't think I'd recommend it. It catches on EVERYTHING!!! I lined the cups in stretch mesh from Bra Maker's Supply and lined the band in cradle in powernet from BMS. I read the instructions like a 1000 times before I made it and I didn't catch that I was supposed to line in cradle in something with no stretch. The elastics I used were also from BMS and they are nice, so soft and strong.


I cut a size 34E but found that the cups are too small. Maybe this is due to the combination of lace and lining, maybe I suck at measuring myself. I'm going bigger next time. I thought the pattern was great, pretty clear, I love that I'm given stitch length and width recommendations. Being new to lingerie sewing, I don't know the lingo yet so I had trouble with figuring out which elastic went where and I that's where the cradle lining debacle came from as well. A big-ass arrow saying "This part of the bra needs this treatment and is called (enter lingerie specific term here)" would have helped, but I think I have it all now. Other than choosing the wrong cup size, the bra fits well, the band is angled to my body just right and the straps hit my shoulders just right so they don't slip and slide. But man, getting the hooks and eyes on are a BITCH!


The undies are pure undie perfection. Completely true to size, even though when I put the pattern together they look like enormous paper diapers. Great coverage and feels secure.

I'm not sure how I feel about making more of these yet, once I figure out the right size I'll have a better idea if this type of bra can be worn on a regular basis with a larger chest. Its so pretty, I hope so!

Sunday, March 29, 2015

Winter of Wearable Shirt: #4.5


Whoops, this one snuck its way in. The Fabric Store had their end-of-season sale and I went back to buy as much of that specific merino in as many colors (except pink) as I could find. I found red and navy, but they were already out of the olive which shot all to hell my planned all olive green merino wool wardrobe. The red is gorgeous though, it has black threads knitted through it which gives so much dimension to the red, which unfortunately doesn't come out in pictures, but trust me, its fabric-mindblowing. I'm such a Fabric Store fangurl.


According to how the last Coppelia fits, I made some changes. I extended the hem by 1.5", shortered the sleeves by 2", reduced the underarm lengths by 3/4", and finally reduced the width of the back bodice by 1/2" blending to nothing at the neck. I also didn't include the hole in the side seam the wrap tie gets threaded through.


Using predominantly the serger to make this top, I can finish this sucker in one day. Boom.


Wednesday, March 18, 2015

Winter of Wearable Shirts: #4

Oh the Coppelia cardigan, we've been flirting for quite some time, but we've only recently gotten together. In some ways, you're everything I thought you would be, in some ways, you've disappointed me greatly.


I made the Coppelia exactly as written in Medium. I had wanted to add an inch or two to the hem, but I barely eeked the garment out of my fabric. The fabric is a GLORIOUS 4-way stretch, ribbed merino wool with some lycra. I don't use knit fabrics without lycra anymore. The wrong side has a slightly looped texture and OMG its amazing. Yes, its from The Fabric Store in LA, my new nirvana.


The good:
There is absolutely no gapping! And for a wrap, that's impressive. More than a little has to do with Coppelia being a knit garment, but still. I did not add clear elastic because I have plenty of lycra in here, but if I change my mind, I'll update you. Its also a quick sew as long as you don't screw up the front neckline. I didn't stretch it enough at first and there wasn't enough fabric for a flat hem. I serged the entire shirt except for twin-needle stitching the tie where I used stretch thread in my bobbin. There's no stitch popping here!

Look ma! No gapping!
The bad:
The sleeves are way way long, and I like long sleeves. The length is way more cropped than I thought it from the pattern picture. I realized this sweater looks good with this skirt which is a fairly high-waisted design and I still have to hike up the skirt quite a bit if I don't want to show off tummy. And finally like so many before me, there's a ton of extra fabric in the front sleeve, freakin' raglan. I also find myself rearranging the ties around my back all the time, but I think I'm just not used to this garment structure.


 The verdict: Winner winner, chicken dinner! Definitely something that has to be worn over a dress or a high skirt, but its completely flattering and the fabric blows all other fabrics out of the water.


Saturday, February 28, 2015

Winter of Wearable Shirts: #3


How are you doing? I'm great, I just made super yummy chicken pot pie filling and I'm nibbling from it. Don't worry, if I ever cook for you its clean spoon every time I test those seasonings, but the fiance will be the only other person eating the pies so I don't care. I'm also working on writing my book, yup I'm writing a book (not about sewing) and I'm totally stuck on the 'I can't write' idea so I'll write this post instead. I know I can write this post.

I've loved the Neptune Tee by See Kate Sew since it was released, but I'm not the person who jumps on every new release. I let them stew around in my head and wait for fabric sales, sometimes for a long ass time. I waited for Hart's to have their Christmas sale and then bought this ponte to bring my total above their free shipping threshold. The pattern says that very stable knits are preferred and Hart's description seemed to satisfy that. I don't usually buy poly, but I trust Hart's implicitly even if I've never been there and only really bought from them once.


Sewing this shirt was a frickin' blast. I got all the right supplies, a stretch twin needle with the widest setting and stretch thread for the bobbin when using the twin needle. All the seams sewed so smoothly, stretch so nicely, and none feel like they are going to pop.


I'm not entirely happy with how the bindings around the neck and sleeves lay across the cutouts. I stretched the bindings to fit the edges, except at the cutouts I made sure to lay the binding completely flat. Now the bindings stick out a bit because the stretch in the neckline doesn't match how the fabric is stretch when worn. Doing it again, I would stretch out the binding ever so slightly. Not as much stretch as the rest of the neckline, just a tad.


See how that neckline is popping out a bit, that's what I'm talking about. Next time I'm making this, I'm lowering the front neckline and removing that cutout, but keeping the rest.

I love the inspiration behind this pattern. I was watching the Veronica Mars movie and and also thought, 'Damn Mac, hot dress.'